With the help of this blog we have been able to repair some old akai sampler. I hope they work another 20 years flawlessly :)
Since every problem a repair is different, I'll post some details.
Daniel de Graaf from NYC wrote me:
The sources of the Infos are these other great sites. I really want say thx to all people who sharing so usefull Information.
http://akaiscsifaq.digidude.net/
http://www.pitsch.de/stuff/amiga/floppy.htm
Since every problem a repair is different, I'll post some details.
Daniel de Graaf from NYC wrote me:
lovely tutorial on replacing the floppy drive in the akai s1100. I have followed your instructions and replaced a 235HF-270u with a 235HF-217u like in your tutorial. I have matched the pinout too etc
The issue I have is that the drive will read discs but not format, write, or load to RAM . I get a few errors "DISK NOT READY!" and "NO DRIVE" and "NO DISC" ... Also I only have s950 discs and a few blank discs. It will read the s950 discs and see programs and samples, but the akai freezes when i try to upload those samples with "P+C".
the electronic retailer I bought this from assured they are all tested to write,read, and format on PCs before they are sold. She mentioned there may be a firmware issue happening.
Do you have any idea how and if I can fix this? I also had her ship me out a few other floppy (another 217, a 240?...) drives to test.
I answered him:
sounds like the jumpers not set correct. The problem is, there are different versions of the 235HF-217-U. Seems like later versions don’t have the DC/RY Jumper so you have to solder the pinout.
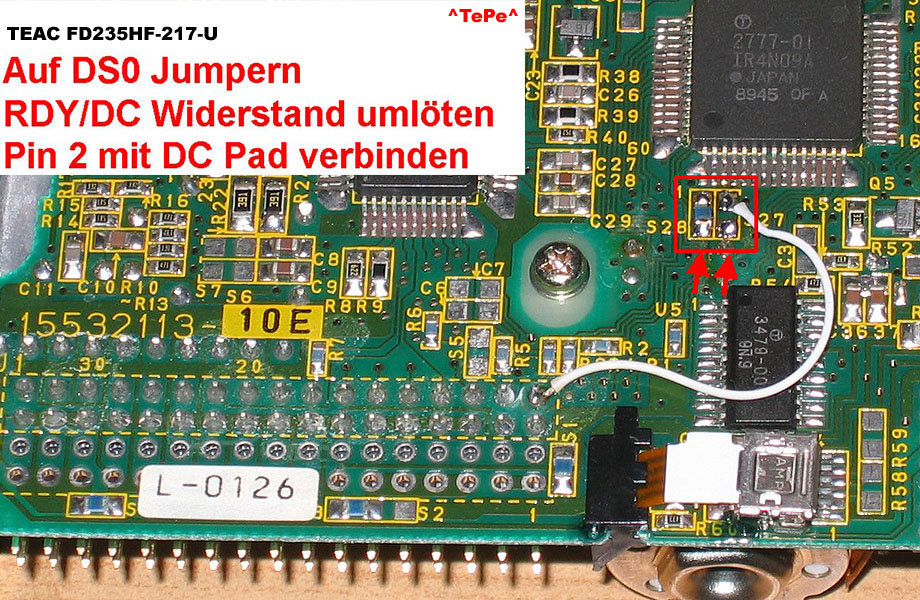
 The jumpers/sliders to change are 2: one selects which drive enable line it will use and one selects what line will be used for floppy detect. The Drive Select jumper is rather easy to find as it is usually labeled "DS": DS0 (for Drive Select 0) and DS1 (for Drive select 1) - you must move it from DS1 to DS0.
Now for the trickier part: you have to change the Floppy Sense or Disk Change to Ready signal. This may be labeled DC/RY. This is a deviator type jumper or slider (usually 3 pins, 1-2 for one setting and 2-3 for another) but can also be a 2pin jumper *or* a "rotatable" jumper if located in a jumper matrix (check 1st pic). This means you need to rotate a jumper left or right 90 degrees from it's default position around one of it's 2 pins. This simply modifies the pin 34 signal (which is usually Disk Change) and reassigns it to send the "Ready" signal.
Well that's it. If you manage to reconfigure these 2 settings, you have a perfectly compatible AKAI (and Amiga) floppy unit which you can use again.
One last note: if you don't have any reference on your floppy for this DC/RY jumper, you may discover it by trial and error - I did this many times as it took me less to try the 3 or 4 settings than to understand where the jumpers went and study the pcb. A good hint on knowing that you hit the right jumper is that when you move it your AKAI shouldn't report a "floppy not ready" or similar error when you have a floppy inserted. Infact line 34, which the AKAI interprets as the Ready Signal is (before the re-configuration) the Disk Change signal. As they behave with inverted logical values (one is active low the other active high) if you leave no disk in the drive, the AKAI will think that the drive is ready and try to read from it! So this will give you some feedback on the jumper you are toggling or moving if it stops doing that (you may have hit the jackpot).
 The jumpers/sliders to change are 2: one selects which drive enable line it will use and one selects what line will be used for floppy detect. The Drive Select jumper is rather easy to find as it is usually labeled "DS": DS0 (for Drive Select 0) and DS1 (for Drive select 1) - you must move it from DS1 to DS0.
 Now for the trickier part: you have to change the Floppy Sense or Disk Change to Ready signal. This may be labeled DC/RY. This is a deviator type jumper or slider (usually 3 pins, 1-2 for one setting and 2-3 for another) but can also be a 2pin jumper *or* a "rotatable" jumper if located in a jumper matrix (check 1st pic). This means you need to rotate a jumper left or right 90 degrees from it's default position around one of it's 2 pins. This simply modifies the pin 34 signal (which is usually Disk Change) and reassigns it to send the "Ready" signal.
Well that's it. If you manage to reconfigure these 2 settings, you have a perfectly compatible AKAI (and Amiga) floppy unit which you can use again.
One last note: if you don't have any reference on your floppy for this DC/RY jumper, you may discover it by trial and error - I did this many times as it took me less to try the 3 or 4 settings than to understand where the jumpers went and study the pcb. A good hint on knowing that you hit the right jumper is that when you move it your AKAI shouldn't report a "floppy not ready" or similar error when you have a floppy inserted. Infact line 34, which the AKAI interprets as the Ready Signal is (before the re-configuration) the Disk Change signal. As they behave with inverted logical values (one is active low the other active high) if you leave no disk in the drive, the AKAI will think that the drive is ready and try to read from it! So this will give you some feedback on the jumper you are toggling or moving if it stops doing that (you may have hit the jackpot).
The sources of the Infos are these other great sites. I really want say thx to all people who sharing so usefull Information.
http://akaiscsifaq.digidude.net/
http://www.pitsch.de/stuff/amiga/floppy.htm
http://rawabiti.com/1n72 FMJSOFT Awave studio free download for midi file format
AntwortenLöschenemrainra Kristi Wilson https://wakelet.com/wake/DeXjSt46IVOhudcGMM-u2
AntwortenLöschennaiplastaslink
stabluApros-se Darrel Hamer Everest
AntwortenLöschenKerish Doctor
NetBalancer
riatincticte